Showing posts with label cake. Show all posts

Friday, 3 May 2019

An old cake, maybe i should bake it again ?


I remember baking this cake for a birthday party! Double layer chocolate cake with Oreo cream and fresh raspberry between the layers! Yummy!


https://www.twitch.tv/sachoza
Sachoza
Entertainer|

facebook icon twitter icon instagram icon youtube icon tumblr icon blogger icon

Wednesday, 13 April 2016

Oppskrift på sjokoladekake (uten egg) med nutella, jordbær og kiwi!


Bakte denne kaken til min svigermor i bursdagsgave. Den falt i smak både hos store og små! Det er en tre lags sjokoladekake med nutella, jordbær og kiwi, toppet med marshmellows fondant !


Ingredienser kake:
10dl hvetemel
5 dl sukker
2 ts vaniljesukker
4 topper med bakekakao
1 ss natron
1 ts bakepulver
1 pk kulturmelk eller kefir
150g smør 
1 pk jordbær
6 kiwi


Slik gjør du:
1. Smelt smøret først, og la det stå å avkjøle seg litt i mens du blander hvetemelet, sukkeret, vaniljesukkeret, kakaoen, natroen og bakepulveret i en stor bolle.
2. Tilsett litt av kefiren, etterfulgt av alt smøret mens du rører forsiktig. Ha i litt og litt mer kefir til du har brukt opp hele pakken og rør ut alle klumpene.
3. Nå alle klumpene er borte, heller du det i en langpanne 30x40 cm, eller i mange små som jeg gjorde.
4. Stekes midt i ovnen på 200°C i 45-50 min. Mine trengte bare 45, da de var mange små. 


Ingredienser til all pynt:
200g marshmellows
500g melis
2ss vann til fondanten, og litt ekstra for å fjerne maisenna melet.
2ss smør
1pk maisenna mel. 
1/2 plate sjokolade for å skrive
Mat farger av ønsket valg. 

Jeg laget kakene dagen før, så jeg pakket dem bare inn i aluminiumsfolie og la de i kjøleskapet til dagen etter. Derimot etter kakebakingen laget jeg marshmellowfondanten, oppskrift på den finner du: Her!

Så da dagen kom, tok jeg fram den ene firkantete kaken jeg hadde baket, og delte den i tre. For å ha jordbærene og kiwiene ferskes mulig ventet jeg med å skjære de opp til dette tidspunktet. Jeg brukte en eggdeler for dele dem i skiver etter å ha fjernet skall og uønsket sider som blir for små.

1. Tok det øverste laget å la det nederst. Smurte på nutella og kiwiskiver.
2. Tok det midterste laget å la nutella på det også, og jordbær.
3. Til sist tok jeg bunden og la på top for å få det flatest mulig, og satte det inn i kjøleskapet.
4. Mens kaken sto i kjøleskapet, kjevlet jeg ut lokket til kaken, og da jeg var ferdig tok jeg kaken ut og  kledde den med fondant. Pynten var laget dagen før, og restene av den hvite fondanten farget jeg rosa, rullet ut og limte på kaken sammen med pynten. Jeg brukte spiselig lim, men hvis du ikke har det kan du ta litt av fondanten med samme farge og blande det ut med litt vann. Det skal bli en klissete masse, lignende av lim/gips.
5. Så smeltet jeg mørk sjokolade, og skrev "Gratulerer" på kaken. 


post signature

Monday, 4 April 2016

Update about my Cake-world!


So yea, I've been busy with getting a new job and everything, and have been very bad about updating what's going on. So for those who follows me on Instagram and Facebook, have I bought and gotten some new tools and books. For those who haven't seen it. I'm going to tell you now!


So first of all, did I buy this turning table and I actually loves it. Tho, I would recommend cover it with plastic due to easier to clean.
Et bilde publisert av Michelle Larsen (@sachoza)


I've been organizing my baking tool, pans, etc... EVERYTHING that has to do with baking!
Et bilde publisert av Michelle Larsen (@sachoza)


And I made some cool green muffins!
Et bilde publisert av Michelle Larsen (@sachoza)


And bough more Baking things from Cacas!


And I made truffles, chocolate and Troika, which I gave to all my family and friends for Christmas. On the Nougat and Oreo truffles, you can read the recipe here in English and here in Norwegian.
Et bilde publisert av Michelle Larsen (@sachoza)


Look how Yummy, Yummy it looks!


And for Valentines day/Mother's day, we did a simple Chocolate cake with strawberry cheese cream and fondant. Decorated it as simple as "I love you" and some hearts, haha!


And I made just a normal chocolate cake with simple editing again, just cause I wanted chocolate cake!
Et bilde publisert av Michelle Larsen (@sachoza)


And I really needed to convince my boyfriend to buy me this, even tho it was super cheap!


And of cause, my newest book I got for one week ago. I love it!
Et bilde publisert av Michelle Larsen (@sachoza)


And last, I baked Macrons last weekend, with strawberry butter cream! Yummy!

So I guess I need to get going with the baking, hehe!


post signature

Sunday, 5 April 2015

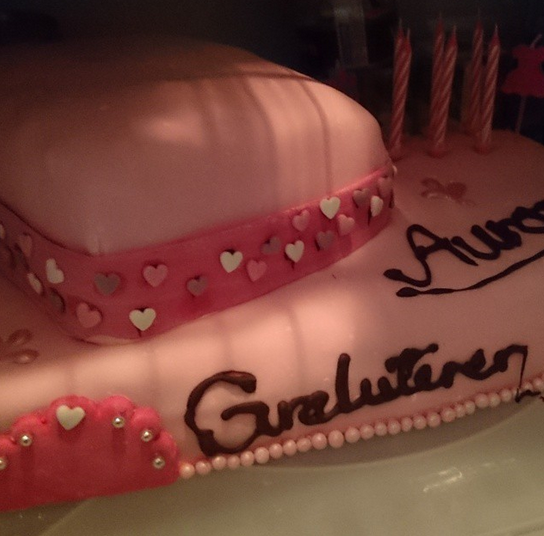
Prinsesse kake til tantebarnet (med oppskrift)


Åh, hjelpes! Det er over en måned siden jeg lovet dere å leggge ut oppskrift på hvordan jeg laget denne kaken, men nå er den her endelig!! (English recipe coming out later)


Jeg startet med å bruke oppskriften til "Konfektkake i langpanne" fra Detsøteliv. Den er utrolig saftig, men jeg møtte på noen komplikasjoner under veis. Siden den er veldig saftig, var det veldig problematisk med å skjære den i lag. Så neste gang skal jeg bruke en annen oppskrift, som er litt mer fastere. Uansett, klikk på navnet for å komme inn på oppskriften hvis du ikke får opp bildet under!


Fyllet prøvde jeg å lage noe nytt som jeg aldri har laget, men var utrolig godt, uten at det var for søtt!

Ingredisenser til fyll:
  • 2 pk marshmellow fluff * 
  • 1 pakke kremost** 
  • 1 pk melis***

* Marshmallowfluff er smeltet marshmallows. Du kan også kjøpe vanlig marshallow og smelte det, men jeg kjøpte en pakke med jordbærsmak og en original uten smak.
** Kremosten må ikke være Philadelphia ost. Jeg brukte Coop sin "Cream cheese". Smaker akkurat det samme, og sparer en 10-er!
*** Melisen er for å få mer smørende konsistens. Hvis du har for mye kremost, kan den bli noe rendene konsistent på. Dette ønsker vi ikke. Det kan også hende at du ikke trenger melisen.


Framgangsmåte:

  • Du starter med å skrape pakkene tomme i hver sin bolle. 
  • I bollen med originalen uten smak tilsettes det først 50g kremost og rør godt.
  • Tilsett litt og litt mer av kremosten til du får en smørbar konsistent,(ikke for tynn eller for tykk), og smaker marshmallows.*
  • Gjør det samme med jordbærfluffen.** 
NB: Ikke bland mere enn MAX 100g kremost pr pk med marshmallow!


*  Hvis den er blitt for tynn er det bare å tilsette melis.
** Jeg bruker alltid mindre enn 100 g på den originalen for å bevare marshmallow smaken. Og så bruker jeg heller nærmere 100g kremost på jordbærfluffen, siden den er litt sterkere i smak.


Kaken kjærte jeg opp fra langpannen, delte den opp slik jeg fikk to lag, og hadde kremene i mellom. Den store fikk den originale marshmallowkremen, og den lille fikk jordbærkremen. Så dekket jeg dem begge i med marshmallowfondant.
Oppskrift på marshmellow fondant og framgangsmåte finner du: HER!

Så satte jeg den lille oppå den store kaken, og pyntet den, og satt den i kjøleskapet.


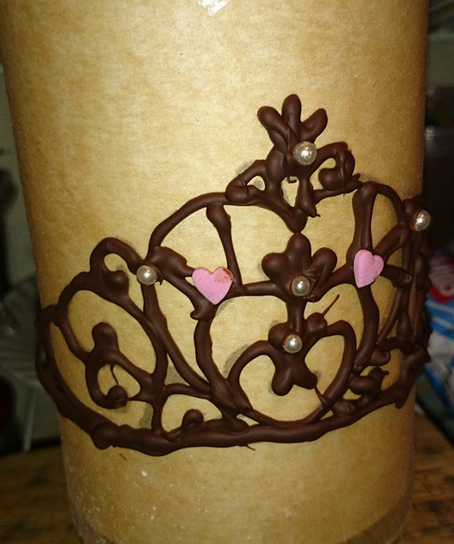
Krona laget jeg med sjokolade, med å feste bakepapir på en brusflaske. Vær OBS på flasken. Dagens flasker er ofte mykere, så fyll den med vann. Da stiver også sjokoladen fortere. 


Så nå håper jeg dere er fornøyd! :) 

post signature

Sunday, 1 February 2015

[Bake] My first two floors cake (with two layers and marshmallow cream)


Okey, it's been like maybe a week, but I've been busy with school and working for ML. But to make you understand, here is what happen:

Last weekend we was invited to my son's niece's birthday party, and has usually I HAD to bake a cake. I knew she was into princess and such, so I thought "why not a princess cake?", and I had the image of the cake in my head for the whole week.

Here was the sneak peek I uploaded to instagram:


Of cause, did I had to make a tiara, hehe. The cake is a two floors with two layers chocolate cake, with marshmallowfluff + cream cheese between, covered with MMF (Mashmallowfondant). The tiara is made out of chocolate as you see. Because of too much chocolate I used it to make dinosaur chocolate figures, not that it fits, but because of fun. 

The recipe will be up later on, but here are some pictures from the birthday party:


Till next time! :)


post signature


Remember to follow me at: 
INSTAGRAM:http://instagram.com/sachoza/
TWITTER:www.twitter.com/sachoza
FACEBOOK: www.facebook.com/sachozagaming
YOUTUBE: http://www.youtube/user/lilleshe
TWITCH:www.twitch.tv/sachoza

Tuesday, 18 November 2014

[Bake] Jelly cake recipe!


http://photos-f.ak.instagram.com/hphotos-ak-xap1/10724664_580724588698997_2089161391_n.jpg


Ingredients:
2 packs for jelly powder.* 
1 liter of water**
4,5 dl cream***
Some raspberries
1 pack of chocolate****
4 eggs
150g sugar
150g flour
1 tsp baking powder

You also need something juicy like juice from a fruit, or a can or something.*****


* It depends on how big the package is of jelly powder, but make sure you got around enough for 10 person/10 dl if you are gonna make the decorations. If you skip the decorations you only need 5 dl! The taste is really up to you, but I used raspberry taste, since the berries are the same.
** This depends on how much water the jelly powder needs. If it says more or less water, add more or less..
*** If you got more cream then 4,5 dl, you can use that on the side of the cake and then have chocolate on the side instead of on the top, like I did.
**** What type of chocolate, depends on what you want. I just regular chocolate. I also bough some chocolate decorations from the store, just to give it more touch. You can use half of the other chocolate, melt it and make it into your own decorations.
***** By adding juice on the layers, the cake wouldn't become so dry. The jelly isn't exactly so juicy.


How to make the layers:
  1. Set the oven on 180 degrease Celsius / 356 degrease Fahrenheit 
  2. Begin with adding the sugar and the eggs into a bowl. Mix it till it feels high and almost all the sugar is gone.
  3. Add the baking powder and the flour, and mix it all together.
  4. Add it into a baking pan. I used a circle one.
  5. Place it in the oven for 30-35 minutes. When it's done, you take it out and let it rest

While the cake it resting, you can make the jelly. This really depends on what you bough and what it says about how to make it. In my country we got these small package which each package it enough for 5 person. So I needed 2 of does, since I wanted some jelly heart decorations as well!

When you are done with the jelly, let it cool down for a little bit in the fridge, but DO NOT let it get stiff!! If you want some jelly hearts like I did, now it's a good time to make does (since they needs to get stiff). You can use a baking pan, like I did, or you can use a cookie cutter.


How to make the cake:
  1. Take the cream and wisp it into a good, solid and tight cream. Add 5dl of jelly, and mix it really good. You will probably think you destroyed the cream and everything, since it's turning out so flowing, but don't panic. That's how it should be.
  2. Take the cake you have made and cut them into three layers. Place the first layer in the baking pan, add some juice on it, and place some of the jelly and cream on it. 
  3. Continue doing this to all the layers, and let the rest of the jelly and cream on the top.
  4. Put it in the fridge, and let it get stiff. 


How I decorated: 
  1. After the cake and jelly hearts had turned stiff, I took them out of the fridge. 
  2. I took a knife and cut around the ages so the cake would not be sticky when I would open the baking pan.
  3. Place the jelly hearts on the cake, and add the berries in the middle.
  4. Slice up the chocolate the way I wanted and added it around the edges. + The chocolate decorations in the middle.


post signature

Monday, 29 September 2014

[Baking] A little shopping trip with 25% off! :D


Last week, actually on Saturday, Panduro had 25% on everything in the store, so I got this has a birthday pressent from my boyfriend. He was actually suppose to order me a massage for my birthday, because I've been through the pregancy and giving birth, but since it cost a lot I asked him "Why not give me this?".


This ended up around 400NOK, and it would have gotten around 550 NOK if it wasn't for that 25% off!


So, now I can make a dinosaur cake for my birthday on his one year old day, hehe. And maybe some dinosaur thingy for my boyfriends cake. We'll see.


And since we went shopping there, we got this for free. So, later I'm gonna dry to make something and see how it turnes out! 


Thank you so much, my love. I love you! <3>


post signature

[Baking] Chocolate cake with chocolate cream


I think it's about time to start bloggin again. I made this cake for one week ago, but life kept me busy, + I had some problems with my memory card.

Anyway, here is the recipe!

Chocolate cake ingerdience:
  • 2,5 dl milk
  • 100 g dark chocolate
  • 225g room tempered butter
  • 2 dl suggar 
  • 4 eggs
  • 4 dl flour
  • 2 tbsp baking cacao
  • 2 tsp vanilla powder
  • 1 1/2 tsp baking powder 

  1. Heath the milk carefully and add chocolate. Let the chocolate melt. Let it cool.
  2. Take the butter and suggar and whip it white cream-ish. Separate the albumen and the egg yolk, and add the yolk into the cream. Now mix them good! Don't trow away the albumen!
  3. Take the vanilla powder, cacao, flour and the baking powder and term them together. Add it into the white butter and suggar cream, and then add the chocolatemilk into it. 
  4. Now you take the albumen and whip it white and add it into the the rest. 
  5. Now you add it in a baking pan. I used a circle one (24cm/9.4 inches).
  6. Bake it in 50-60 minutes on 175C/347F, in the middle in the oven. 

  Chocolate cream ingredience: 
  • 2tbsp cream 
  • 50g dark chocolate
  • 75g room temperated butter
  • 1dl icing suggar
  • 2tsp vanilla suggar
  1. Heath up the cream and chocolate, and when the chocolate is melted, let it cool.
  2. Mix the butter, vanilla suggar and icing suggar together, and add them into the chocolate and cream.
  3. When you have mixed it all together, the chocolate cream is done!


How to put the cake together:
  1. Cut the cake in as much layers as you want. I used two layers, but I feel I should've gotten three.
  2. Build them above each other with the chocolate cream between. (If you want to add some berries between the layers, it would make the cake even better!)
  3. Put the cake into the fridge for some couple of hours. This will let the cake take some of the juice of the cream, so it's getting less dry.

 
Decorate:
  • 3dl cream
  • All the berries you want!
How you want your cake on top depends on you. I went with cream and berries on top. (Strawberries, blueberries and raspberries).


post signature


Monday, 22 September 2014

[Baking] Chocolate cake w/ Chocolate filling and MMF (Marshmellowfondant)


Thank you so much everybody that have been voting for me! 


Well, since there was so many people that enjoyed my cake, and wanted the recipe, I have decided to republish the recipe only that this time it will be in English! 


Anyway! ~ Ingredients:

Ingredients For the cake:
60g melted butter
4 dl milk
5 dl flour
2,5 dl sugar
2 tablespoons baking cocoa
1 teaspoon baking soda

Filling:
130g melted butter
400g icing sugar
2 teaspoons vanilla sugar
2 teaspoons coffee
2 tablespoons baking cocoa

MMF:
300 g Marshmellow
3 tablespoons water
500g icing sugar

To create a land pan, simply double cake recipe.


Procedure:

The cake: 
1 Mix all dry ingredients in a bowl and add the melted butter and milk.
2 mix until a smooth batter and pour into the baking pan you want.
3 Bake in oven at 175 Celsius degrees for about 30 minutes.

Note: The cooking time varies from oven to oven. Use a cake pop to be sure!

Procedure for filling: 
1 Mix the dry in a bowl.
2 Add the melted butter and boiled coffee.
3 Stir until well mixed and place in the refrigerator until the filling has been cold but not hard!

Procedure on MMF:
1 Take 300 g marshmellow in a bowl and add 3 tablespoons of water.
2 Insert in the micro until they are inflated.
NOTE: You must be looking at because this can go fast!
3 When the marshmallow is finished, stir and add the icing sugar until you manage to make a "lump" of it. If necessary, have the food coloring if you want color on MMF.
4 Wrap it in plastic and leave it room temperature.

If you make the MMF the day before or got some left overs you want to use later, just place it in the refrigerator. Just remember to let it stay in room temperature in some minutes before using.

How to assemble: 
1 When the cake has cooled, divide it into as many layers as you want.
2 Place cake layers and fillings layers by layers until you run out of cake, but have also a layer of filling on top. This will be used for "glue" for MMF.
3 Roll out the MMF as thin as you want without tearing. Roll it rather too large than too small in circumference!
4. By eye, find the midpoint of the cake and MMF, adding MMF over cake. Remember that it will be a little beyond the sides, since we intend to roll down the MMF on the sides of the cake too.
5 Start by stroking gently on top to make it flat and get out the bubbles.
6 Hold the MMF that is hanging down the side and gently stroke from the top to down on the side. Remember to not hold back, because then it will rips the MMF.
By doing this, the transition from the top to down tier pages much finer, smoother and no air bubbles underneath.
7 After you have done this around the cake, take a knife to cut the bottom of the cake so you get off the MMF that is left over.
8 The rest of MMF can be used to create decorations, or put in the fridge and save it for the next cake. Just remember to leave it on the counter for a little while before use. (Like I said earlier)

And volla, the cake is done! Enjoy! :)
post signature